
Pi 2 Design - Mercury Streamer V2
The Mercury Streamer, designed and manufactured by PI 2 Design, is a Compute Module 4 based device designed for Professional, Studio Grade, Digital Audio Streaming. The Mercury Streamer converts the Compute Module 4 I2S Interface to High Definition Professional Digital Audio Coax, OPTO and Balanced XLR. These multiple, simultaneously active digital audio outputs allow the Mercury Streamer to optimally interface with virtually any High Performance DAC on the market.
The major features of the Mercury Streamer are as follows:
The major features of the Mercury Streamer are as follows:
- COMPUTE MODULE 4 - This module provides 4 High Performance ARM Cores, Dual 4K HDMI Output, PCIe x1, Gigabit Ethernet, 4/8GB DRAM
- M.2 2280 SSD - A Standard M.2 Socket is provided for NVMe Storage via the CM4 PCI Express x1 Link. The socket supports both “M” and “B” Key devices.
- GIGABIT ETHERNET - A standard RJ45 Provides the interface to the CM4 Gigabit Ethernet I/F.
- DUAL EXTERNAL USB2.0 - This connector provides two USB2.0 Host Ports.
- EXTERNAL HDMI - Two 4K HDMI Connectors provide access to CM4 HDMI 0 and 1
- AES TRANSMITTER – The industry standard WM8804 converts the CM4 I2S stream to AES3/SPDIF formatted data at 24-Bit up to 192Khz Frame Rate
- AES COAX OUTPUT – A 1:1 Isolation Transformer provides Bit Perfect Impedance Controlled Digital Audio Data @ 1V AES Standard Level.
- AES BALANCED OUTPUT – An RS-485 Transmitter with a 1:1 Isolation Transformer provides balanced audio data via the Professional XLR Connector
- TOSLINK OPTICAL OUTPUT – Isolated Optical Transmitter Drives Consumer Level DAC’s
- SPDIF COAX OUTPUT - A 1:1 Isolation Transformer provides Bit Perfect Impedance Controlled Digital Audio Data @ 0.6V Consumer Standard Level.
- DIFFERENTIAL I2S OUTPUT – An LVDS Differential Transmitter drives the I2S Bus over an HDMI Connector. Pinout support most I2S DAC's.
- PARALLEL I2S OUTPUT - The I2S Signals are buffered and accessible via an RJ45. Pinout conforms to the Metrun series of DAC's.
- HIGH RESOLUTION CLOCKS – A pair of Ultra-Low Noise NDK NZ2520SDA oscillators drive the WM8804 in non-PLL mode for the lowest possible noise.
- ULTRA-LOW NOISE LDO’s – Two Ultra-Low Noise LT3042 LDO’s (0.9 uV noise and 80 dB PSRR) are used to supply the WM8804 and the NDK Clock’s.
- LINEAR PRE_REGULATOR - LT2941 LDO 5V pre-regulator allows the entire power chain to be linear when an external linear PSU is used.
- LOW NOISE PCB LAYOUT – 4-layer Split Ground PCB with noise reduction techniques refined from years of High-Speed Mixed-Signal Design work.
- EXTRUDED ALUMINUM ENCLOSURE – Rugged, Aircraft Grade Aluminum, Anodized (box) and Powder Coated (front/rear) for Scratch Resistance
- PRE-PROGRAMMED 32GB SD CARD - Mercury comes with a 32GB SD Card loaded with Volumio 3.x (other OS's TBD)
Mercury FAQ - Frequently Asked Questions
Be aware that the USB ports on Mercury are USB2.0 with a MAXIMUM current output of 1A per port or 1.5A total. While there is over-current protection built in, it is still possible to damage the board plugging in high powered USB devices that are not powered from their own PSU. Please exercise caution. If in doubt use a powered hub in between Mercury and your device.
Q: Do all Mercury outputs work simultaneously?
A: Yes, all digital audio outputs deliver the same audio data at the same time. This includes the RJ45 I2S (V2 only) and I2S over HDMI.
Q: What power supply comes with Mercury ?
A: Mercury is designed to operate with a nominal input voltage 12V (+/- 10%). We provide a High Quality Meanwell 12V @ 3.3A switching supply.
Q: What size is the power Jack on Mercury?
A: Mercury V1 uses a 2.1MM x 5.5MM DC Jack. Mercury V2 uses a 2.5MM x 5.5MM DC Jack.
Q: What pinout is supported by the I2S over HDMI?
A: Mercury V1 supports the PS Audio pinout only. Mercury V2 allows each signal to swap polarity allowing it to connect to virtually all DAC's.
Q: What OS does Mercury support?
A: Mercury supports all known Raspberry PI OS's. Some software will require that the USB Host function be enabled as the CM4 (inside Mercury) does not do that by default. Our pre-configured images have this fix in place. For other OS's see this set of instructions to do this:
www.jeffgeerling.com/blog/2020/usb-20-ports-not-working-on-compute-module-4-check-your-overlays
Q: Does Mercury V2 support other SD Cards besides the Samsung EVO?
A: Unfortunately some other cards do not boot reliably. The Samsung EVO and PRO boot reliably so if possible use those. This is a known issue and we are investigating. In the mean time, you may also boot a wider variety of cards using a USB SD Card reader plugged into one of the USB ports. Simply push in the SD Card to pop it out and Mercury V2 will then boot from the USB. This is also an excellent way to try other OS's.
NOTE: Mercury V2 SD Card Boot Issue - FIXED
When the CM4 boots it talks to the SD CARD very early and depending upon the card it is not yet up. The enable pin from the CM4 is driven kind of late so only the cards that come up fast will work. Adding a pullup to the enable pin starts the card up as soon as 3.3V is up, not waiting for the CM4 to drive enable. In essence bypassing the enable!
We are implementing this fix on all units as of 12/30/2022. Prior units can be sent back for the fix, but since the Samsung cards we supplied work, it is not a warranty fix. You'll need to cover shipping to us, but we'll cover the return.
Q: Why is my WiFi weak or unable to connect?
A: In addition to USB Host, the CM4 does not enable the external antenna by default. You must add the following to the config.txt file:
www.jeffgeerling.com/blog/2022/enable-external-antenna-connector-on-raspberry-pi-compute-module-4
Our pre-configured Volumio image has this fix in place as of 01/20/2023. Thanks to user Michael B. who pointed this out!
Q: How do I initialize the internal SSD for use?
A: While the current versions of Raspbian OS automatically detect and initialize the SSD, as of this writing, the various Audio Software players (Volumio, Moode, Ropieee, etc) do not. This requires a fair amount of under the hood tinkering. Luckily SBAF user @edwyun has posted the process they used with great success. See it here:
www.superbestaudiofriends.org/index.php?threads/pi2aes-mercury-streamer.13279/page-2#post-412611
V1 Hardware Reference Manual
| mercury_streamer_hw_reference_manual_v1.pdf |
V2 Hardware Reference Manual
| mercury_v2_hw_reference_manual_p2.1.pdf |
Getting Started with Volumio
For Volumio start guide is here:
https://volumio.com/wp-content/uploads/2020/02/Quick-Start-Guide-Volumio-1.pdf
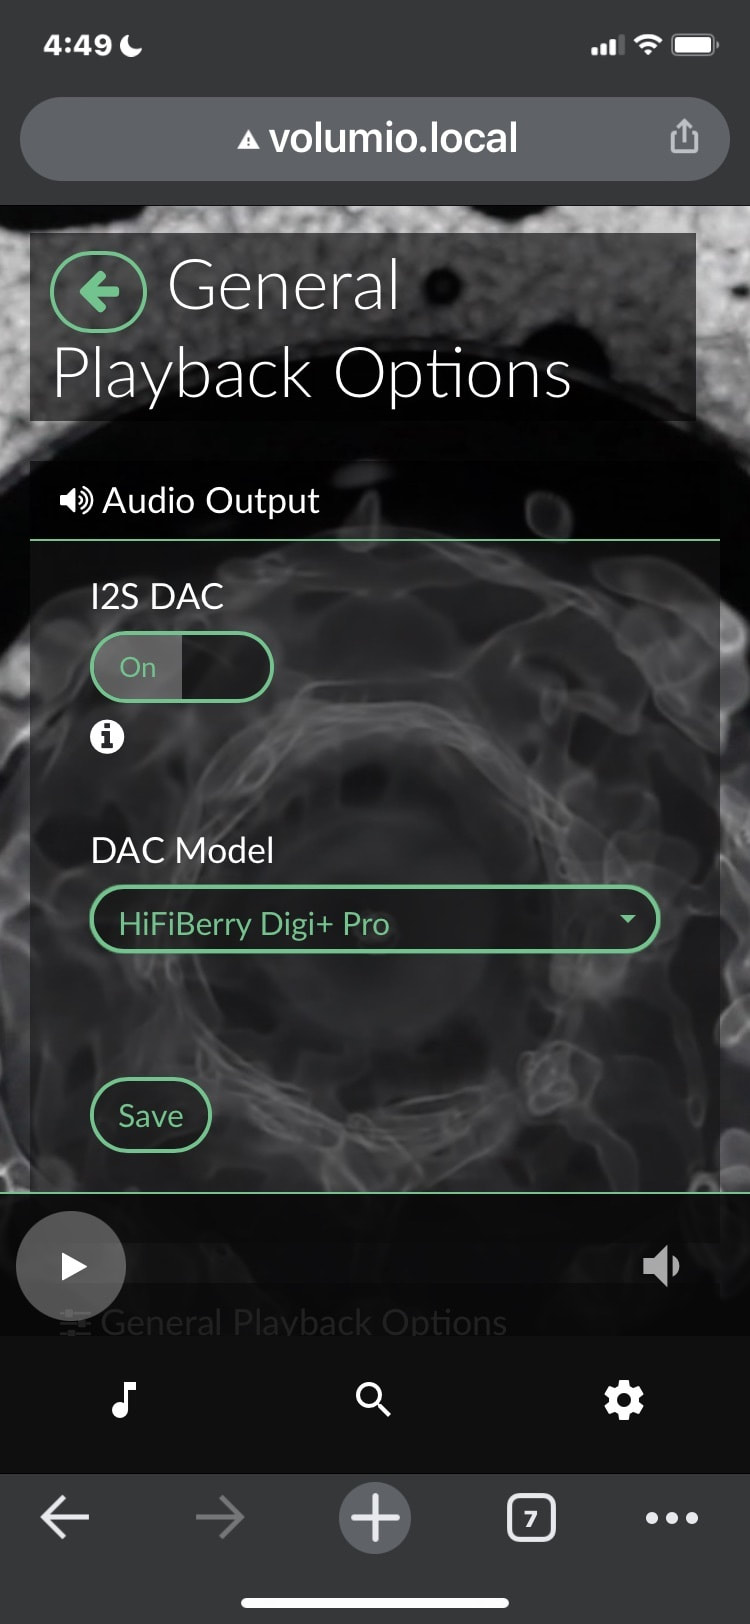
You can skip steps 1-2 and go right to step 3. Do Not Change the I2S DAC settings! This does not refer to the external DAC, but instead is used to load the proper driver for Mercury. See screenshot for the proper setting, but do not change it.
https://volumio.com/wp-content/uploads/2020/02/Quick-Start-Guide-Volumio-1.pdf
You can skip steps 1-2 and go right to step 3. Do Not Change the I2S DAC settings! This does not refer to the external DAC, but instead is used to load the proper driver for Mercury. See screenshot for the proper setting, but do not change it.
Pre-Configured Volumio SD Card Image - 8GB
This is a Volumio 3.396 image with the necessary settings for Mercury. This includes USB Host, External Antenna and "HiFiBerry Digi+ Pro" Driver. Note that HDMI output, if desired, requires the touch screen plugin. This then requires an account (even a free one).
https://www.dropbox.com/s/c0yipk4mgsa66w2/volumio_3.396_mercury_ant.img?dl=0
Update - 01/30/20232
Add the following to the user_config.txt in Volumio to support the auto-power off sequence:
# Hold power on after we boot
gpio=22=op,dh
#Trigger power off when switch is in off position:
dtoverlay=gpio-shutdown,gpio_pin=24,active_low=0,gpio_pull=up,debounce=1000
https://www.dropbox.com/s/fs1jyadckkwvl2y/volumio_3.396_mercury_ant_pwr.img?dl=0
Pre-Configured Ropieee Image - 8GB
This is a RopieeeXL 2023-1.0 image with the necessary settings for Mercury. This includes USB Host, External Antenna and "HiFiBerry Digi+ Pro" Driver.
www.dropbox.com/s/v6mk671rb0ly3dv/ropieeexl-2023.1.0-mercury_ant.img?dl=0
www.dropbox.com/s/v6mk671rb0ly3dv/ropieeexl-2023.1.0-mercury_ant.img?dl=0
Pre-Configured Moode Image - 8GB
This is a Moode 8.2.5 image with the necessary settings for Mercury. This includes USB Host, External Antenna, HDMI Output and "HiFiBerry Digi+ Pro" Driver
www.dropbox.com/s/uojqpsx33iazcjn/moode-r825-mercury_ant.img?dl=0
www.dropbox.com/s/uojqpsx33iazcjn/moode-r825-mercury_ant.img?dl=0